Chasing the Aurora: A Photographer's Real-World Guide to Shooting Northern Lights in Iceland
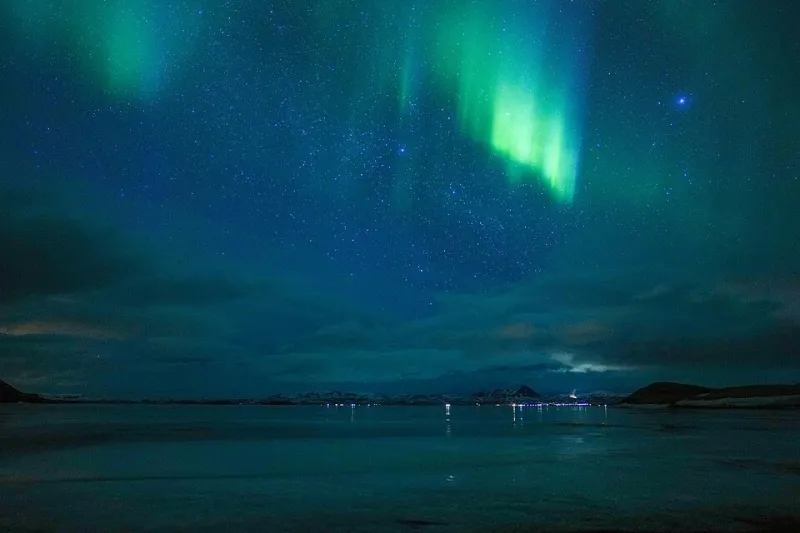
Photo: Giles Laurent, CC BY-SA 4.0, via Wikimedia Commons
Let's be honest. Most Northern Lights photos you've seen on Instagram were either lucky accidents or the result of someone who'd been standing in a frozen field for four hours, had their settings dialed in cold, and knew exactly which direction to point their lens. The aurora doesn't perform on demand. It flickers, fades, explodes across the sky without warning, and sometimes just... doesn't show up at all.
That's the deal you make when you fly to Iceland chasing the lights. And honestly? It's part of what makes a great shot so satisfying when it finally happens.
This guide is for photographers who want to stack the odds in their favor — not just cross their fingers and hope.
Understanding What You're Actually Photographing
Before you touch your camera settings, it helps to understand what causes the aurora. Solar wind particles collide with gases in Earth's upper atmosphere, releasing energy as light. The strength and visibility of that display depends on something called the Kp index — a scale from 0 to 9 that measures geomagnetic activity. In Iceland, you can often see auroras at Kp levels as low as 2 or 3, which is great news. You don't need a solar storm to get a decent show.
The apps worth having on your phone: Space Weather Live, My Aurora Forecast, and the Icelandic Met Office app (vedur.is). Check all three before heading out. Cloud cover is often the bigger enemy than solar activity — Iceland's weather changes fast, and a Kp of 6 means nothing if you're shooting through solid overcast.
Camera Settings That Actually Work
Here's where a lot of first-timers get tripped up. The aurora moves. Sometimes it pulses slowly, sometimes it dances across the sky in seconds. Your settings need to balance light sensitivity with motion sharpness.
Start here and adjust from there:
- ISO: 1600–3200. Go higher if the aurora is faint, but watch your noise levels.
- Aperture: Wide open. f/1.8 or f/2.8 if your lens allows it. The more light you pull in, the better.
- Shutter speed: 5–15 seconds for a sharp, defined aurora. Go longer (20–25 seconds) for a softer, more diffused look — but you'll lose detail in fast-moving displays.
- Focus: Manual, set to infinity. Autofocus will hunt in the dark and miss. Use live view to focus on a bright star before the show starts.
- File format: Shoot RAW. Always. You'll thank yourself in post when you're pulling detail out of shadows.
A sturdy tripod isn't optional — it's the whole game. Wind is Iceland's default setting, so bring one you trust.
Beyond Reykjavik: Locations Worth the Drive
The tourist circuit tends to cluster around the Reykjanes Peninsula and spots just outside Reykjavik. Those work fine, but light pollution and crowds are real factors. If you want cleaner skies and better compositions, go further.
Snæfellsnes Peninsula is one of the most underrated aurora shooting locations in the country. The Snæfellsjökull glacier provides a dramatic foreground that most aurora shots lack entirely. The drive from Reykjavik takes about two hours, and the payoff — a glowing sky above an ice-capped volcano — is the kind of frame that defines a portfolio.
The Westfjords are remote and require commitment, but the darkness there is something else. Very little light pollution, rugged coastal landscapes, and a sense of genuine isolation that adds atmosphere to every shot.
Jökulsárlón Glacier Lagoon in the southeast is a classic for a reason. Floating icebergs reflecting aurora colors below and above the frame — it's almost unfair how good those compositions can be. Visit on a calm night when the water surface acts like a mirror.
Landmannalaugar in the highlands is only accessible in summer and early fall, but the colorful rhyolite mountains under a green sky are unlike anything else in Iceland.
Timing Across the Seasons
The aurora season in Iceland runs roughly from late August through mid-April — you need darkness, which means the midnight sun period (June and most of July) is a write-off for aurora hunting.
September and March are sweet spots. The nights are long enough to give you a solid shooting window, but you're not dealing with the extreme cold of January and February. That said, winter trips have their own rewards: snow-covered landscapes make for incredible foreground elements, and the long nights give you more hours to work with.
If you're planning a dedicated aurora trip, build in at least five or six nights. Assume at least two will be clouded out. That buffer is what separates photographers who come home with a great shot from those who come home empty-handed.
Composing When the Sky Won't Cooperate
Here's the part nobody talks about enough: what do you do when the aurora is weak, patchy, or just a faint green smear on the horizon?
You compose around it. A thin band of aurora above a dramatic lava field or a lonely farmhouse with warm light spilling from its windows can be more compelling than a chaotic full-sky display with no anchor. Strong foreground is what separates aurora photography from aurora documentation.
Scouting locations in daylight is non-negotiable. Walk the ground. Know where the interesting rocks, water reflections, and structures are. When it's dark and cold and you've got maybe 20 minutes of activity overhead, you don't want to be figuring out where to stand.
Also: shoot the twilight. Iceland's blue hour before full dark is stunning on its own, and it's excellent practice for getting your settings and composition locked in before the main event.
A Few Things Nobody Told You Before You Left
Dress for conditions that are colder than you think. Gloves that let you operate your camera controls are worth every penny — cheap gloves mean you'll take them off to adjust settings, and cold fingers make mistakes.
Bring a headlamp with a red-light mode. It preserves your night vision and won't ruin other photographers' shots if you're shooting near a group.
And finally — put the camera down for a few minutes. Seriously. The Northern Lights are one of those things that a screen, no matter how good your shot is, doesn't fully capture. Watch them with your own eyes at least once. Then go back to shooting.
Iceland's aurora season is short, the conditions are unpredictable, and the whole experience is a little chaotic. That's exactly why the shots you bring home feel earned.